Publish a customer event
This example creates an invitation to a customer event, including a registration form (using a block), a thank you for the registration page, and a teaser block for the start page. All content items for the event are scheduled to be published at the same time.
- Create a project for the event from the project bar and call it Customer event.
- Prepare a page with information on the event. The page is automatically added to the project. You can set the page to Ready to publish or do that later.
- Prepare a thank you page.
- Create a registration form using the built-in form functionality or the Optimizely Forms add-on. Set up the form so that a visitor who registers for the event is directed to the thank you page.
- Create a teaser block to use on the start page for promoting the customer event and drag it to the start page. The Customer event project contains items related to the event.
- Preview the pages by clicking Preview.
- Does the start page contain the teaser?
- Does it lead to the customer event detail page?
- Fill in the form and ensure you are directed to the thank you page.
- Go to the overview and select all items by pressing Shift and selecting the top and the bottom items.
- From the context menu of one of the items, choose Ready to publish, and all items are ready to be published.
- Select Options > Schedule Items for Publish in the overview.
- Select 1 August at 11 AM and click Select.
You cannot edit scheduled versions of items in a project. If you need to publish the start page before the scheduled version is published, you need to create a draft and then publish that. To incorporate the same changes into the scheduled project version of the start page, you must remove the scheduling, edit the content, and then re-set the scheduling.
Publish a campaign
This example creates a fashion sales campaign with multiple content items on a website with Optimizely Content Management System (CMS) and Optimizely Commerce Connect. The campaign will go live on a specified date and contain a landing page with a product listing block, two new products to be listed in the block, and a teaser block for the start page. You create the project first and then add the content items.
- In the Optimizely Commerce Connect catalog tree, create a project for the campaign and name it Spring Collection.
- Prepare draft versions of the catalog items in Optimizely Commerce Connect, create and edit the catalog entries, and add product descriptions and assets as desired.
- When done, drag the prepared catalog entries from the Catalog gadget to the Project gadget, where you set the products to Ready to Publish before they are added to the project, but you can do this later.
- Switch to the CMS edit view and create the landing page for the Spring Collection. Add text and assets as needed, and drag the landing page to the Spring Collection project.
- Create a block listing the products included in the spring collection, and include it in the landing page. Add the product listing block to the project.
- Create a teaser block to be used on the landing page for promoting the spring collection, and add the teaser block to the project.
- Drag the teaser block to the start page, and add the start page to the project. The Spring Collection project now contains the items to be included in the campaign.
-
Preview the content items in the project, edit as needed, and set to Ready to Publish when done.
- Schedule the project to be published on the defined go-live date for the campaign.
Manage multiple content language versions
This example creates a page with a registration form block for an event. The included items must be available in English (the original website language), French, and German, and you must manage the translation using a project.
- Create the page and the related forms block in English first.
- Create a project and name it Spring Meeting.
- Add the English versions of the page and the forms block to the project.
- Enable and activate the desired languages (here French and German) on your website, if not already done. (Must be done by an administrator.)
- Switch to the French language branch and create a French version for the page and form block.
- Drag the French version of the content items into the Spring Meeting project.
- Repeat the previous actions for the German language version. The project has six content items, two for each language version.
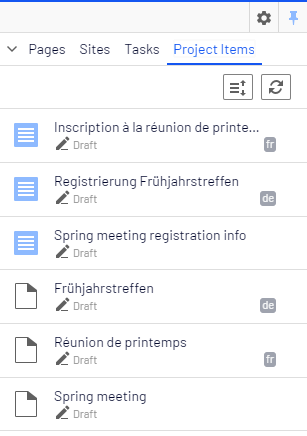
A language code displays for items in other languages. In the image above, the English site is selected under **Sites**; items in English are not marked with a language code. - Translate the content items into French and German, respectively.
- Set the content items to Ready to Publish when done, and publish the project or schedule it for later publishing.

Please sign in to leave a comment.